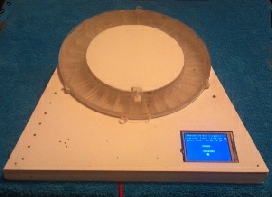

A medication alert and dispense system with adjustable dosage time and compliance monitor.
CS 3651 Summer 2013 - Summet
Automatic
Medication
Dispenser

Materials / Parts

Functionality
The basic mechanics are that of a disk with 28 compartments rotating around a central axle while housed inside of a ring. The base of this disk is actually a gear with inner teeth and it is rotated using a stepper motor. The motor is housed under the disk. The micro controller should be geared toward running the stepper motor, generating sound and accepting touch screen input. The electronics are all housed in the trapezoid shaped box attached to the disk housing. This gives plenty of room to add on “stuff” later like Pulse Oximeter, BP monitor, Air flow sensors for sleep studies, EKG / Holter monitoring, Finger print scanner etc.. Feel free to substitute materials and parts.
|
Acrylic (various thickness) |
$ 150 |
Wood is a much cheaper alternative. (McMaster-Carr is expensive) |
|
Acrylic adhesive (SC125 Caseway Industrial Products) |
$ 20 |
This literally welds the acrylic pieces. Do not use messy epoxy here. |
|
Touch Screen Monitor -(built in Micro cont) PIC24FJ256GB110 |
$ 99 |
If you cannot program this then go with a PC interface. Sample code is in the Programming page. - Order Online |
|
Stepper Motor - We used A 12V Mercury Motor - SM-42BYG011-25 |
$ 15 |
5 V stepper motors are readily available but have a low torque rating. |
|
Old Junk motor - for a stable Axle |
$ 0 |
Get from an old fax or printer. |
|
Motor Driver (buy or DIY like we did per schematic below) |
$ 10 |
If you are using a bipolar motor or motor that needs more than 5v |
|
Sprockets for axles |
$15 |
You can attach your gear to the axle with this (Hobby Town USA) |
|
Screws size 4-6 ½” #6, 3 mm bolts 1-2 cm long & nuts #4 of each, 2 mm pins #4, 1 smallhinge |
$ 15 |
Get from Radio shack, Walmart, Hobby Town USA |
|
Stainless Steel Ball bearings (3-4 mm D) |
$ 3 |
Put about 6 of these into pre cut holes below the rotting disk (can get form McMaster-Carr) |
|
Wires and snap on connectors |
$ 5 |
Radio shack |
|
Wooden square tiles, Velcro, Epoxy glue |
$ 12 |
Glue this to the back of electronic component modules and attach to velcro for each placement and removal inside box (Hobby Lobby) |
|
Speaker |
$ 3 |
Strip from an old head phone or buy from Radio Shack |
|
Generic Vaseline |
$ 3 |
Use as lubricant for ball bearings etc (any pharmacy chain) |
|
Circular 3” Cup from Hobby Lobby |
$ 2 |
This will house the motor and axle on bottom and support base |
|
Misc. Electronic components |
$ 10 |
Resistors etc per schematic (Radio Shack) |
|
Solder |
$ 2 |
Radio shack |
|
Gear Simulator (Software) |
$ 0 |
Download this for free - This will help you design your own gears |
|
Draftsight (Software) |
$ 0 |
Download this for free - This will help you design and print your acrylic parts using .dwg files. |
|
Vinay’s Magic Powder (Optional) |
$ 99 |
Sprinkle this on your finished product to make it work perfectly |
Cost
Comments
Build Details

Time issues for Construction (Work time varies with level of task related experience)
|
Task |
Research |
Work |
Comments |
|
Mechanical design |
60 hrs |
2 hrs |
No flawed designs means just 2 hrs to copy ours. |
|
Ordering / Purchasing supplies |
30 hrs |
2 hrs |
We spent a lot of time getting unusable items. |
|
Laser cutting parts |
10 hrs |
1 hr |
Just get a friend of a friend that knows how to do it for you or you have just wasted a lot of money. |
|
Assembling Mechanical parts |
30 hrs |
3 hrs |
We were trying to reinvent the wheel |
|
Assembling Electronics |
20 hrs |
2 hrs |
Have all your electronics and tools together |
|
Touch screen programming |
40 hrs |
1 hrs |
We had very few libraries to work with |
|
Blaming teammate for problems |
10 hrs |
0 hrs |
Hopefully this will go well for you |

Photos / Schematics

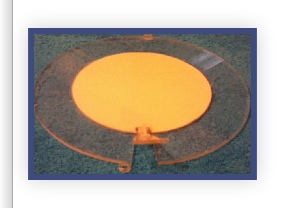
Acrylic Disk Cover with latch attached by a plastic hinge using epoxy.
The parts listed here can be switched based on your preference. A basic understanding of how to use a hand held tool such as a Dremel is good. A basic knowledge of how Arduino type controllers work is also good. The acrylic must be laser cut. Do not use a band saw to cut acrylic. Cut multiple layers of acrylic and weld to get the desired height. You can drill holes into acrylic as long as you put acrylic behind the piece that you are drilling through. Laser cutting all of your holes is preferred. You can and or grind down thickness of acrylic using a Dremel type tool (wear a mask). Use wood if you feel more comfortable. Plywood can also be laser cut. If you wish to program the micro controller without a touch screen and prefer everything to be done via a PC interface then only that component would be changed. A uni-polar stepper motor will do the job as long as you watch the voltage and current flow (you could wind up burning out your motor or your micro controller). This is where your H-Bridge comes in. Standard USB is 5v so if you stick with a 5v motor you will not need this. Make sure that you leave about 2 mm of space between the rotating disk. and the inner wall of the outer ring. Too much space will allow your pills to drop out, and too little space means a lot of sanding like we did. The pictures below contain dimensions and schematics. Good luck and have fun. Below are some helpful links.
Welding Acrylic - http://www.youtube.com/watch?v=hT6Ow_cBTps
Stepper motors - http://www.hackmelbourne.org/wiki/index.php/Info/Controlling_Stepper_Motors (useful links here)
Using a 12 v DC motor with Arduino - http://www.erfssn.org/tutorials/arduino/interfacing-dc-motor/
Acrylic Cover (spray painted white) for trapezoid base. With monitor window.
Circular Medication Disk with 28 compartments. Gear with inner teeth.

Side view of Mediation disk. Note it is made of 2 disks layered for thickness.
Base with motor to the right and central axle. Speaker attached upper left corn.
Underside of Housing with motor covered by a white cup with velcro.

Screenshot of .dwg file all figures are drawn to scale.
Schematic for motor connections.
This is what it should look like when it is wired. Lots of space for other stuff!